Monday, December 9, 2013

Na-na-na-na-na-na-na-na...Batma...banana bread!

One of life's little comforts is a strong cup of coffee or tea with a thick slice of banana bread. I envy my Mum's bread that she makes and so I figured it was high time for me to give it a go...with my own twist. 

I wanted to try out something other Pinners had made note of -- using yogurt in the recipe. *Did I mention I have never tried to make any kind of bread before? Wish me luck.* So at 7pm on a Monday night I figured, what the hell? Let's give this a shot. 

Start out by preheating your oven to 350 and lining/greasing a loaf pan. In usual Stace fashion I like to do both, so I used parchment then greased that. Cleaning up is a breeze. If you don't like the paper being all sticky-out-y, just trim it closer to the pan edge after your batter is in. 

 Now, ingredients!
~ 2 seriously overripened bananas (mine were in the freezer first. I took them out to thaw for about an hour +, then peeled and mashed 'em.) 
~ 1/2 cup vanilla yogurt *I used the lactose-free variety. 
~ 1 tsp. baking soda 
~ 1/4 cup sunflower oil 
~ 3/4 cup brown sugar 
~ 1 egg, beaten 
~ 2 tsp vanilla extract 
~ 1 & 1/2 cups flour 
~ 1 tsp cinnamon 
~ 1 tsp baking powder 
~ 1/4 tsp salt 

Get out three small/medium/large mixing bowls. 

Bowl 1: Combine the banana, yogurt and baking soda in the small bowl. 

Bowl 2: Sift together the flour, cinnamon, baking powder and salt in the medium bowl. 

Bowl 3: This is your biggest and main mixer-upper. Gently blend together your oil and brown sugar, slowly adding in your egg and then the vanilla. 

Using your mixer on low (or your own raw strength if you're so inclined, tough guy,) add 1/3 of the banana mix to the sugar bowl, then 1/3 of the flour mix, alternating until bowl one and two are empty and all ingredients are JUST moistened. **Don't overwhip this sucker or your bread will be a bit tough. Well, so they say online. I have no flippin' clue because remember, I've never done this before either! 

Now pour that brown gooey goodness into your lined pan.  Bake for about 40-50 minutes. 

As with all baking, it can take a turn for the worst in a matter of minutes so watch that thing for any sign of possible burning! I stuck a fork in mine at 45 minutes and it came out wet so I let it go for about another 8-9 and then it was happy-happy to come out and be eaten. 

Let it sit in the pan for about ten minutes, then transfer to your plate for cutting. A piece while still warm, with melting butter? Why yes, don't mind if I do. 

Final result/opinion: This turned out great. It was moist, dense, and had lovely flavor. I will definitely make it again and may try it with three bananas next time...because I'm cray-cray like that. Get baking, Stace.

Tuesday, October 29, 2013

Quick n' Dirty.

....though I really recommend you wash them first. What?! 

I'm talking about big, beautiful russet (baker) potatoes. I always leave the skins on mine for extra vitamins, but feel free to peel them if you're so inclined. My title refers to the fact that I can only provide the recipe and one measly photo! I made this yesterday, but failed to take pics of the progress.

Crud! Sorry about that. Alas, this was some of the best soup I've ever made and so will definitely make it again.

I made a post on Facebook that I was cooking up a gongshow amount of bacon, in prep for this recipe. I got emails, comments, and conversations at the office today asking me how it turned out. Um....AWESOME, that's how. Wait, did I say that already? Right. Yes. BEST soup. Let's even throw a "HOT damn!" in there. 

So now it's your turn. Do you own a crockpot? Then make this. Like, tomorrow night. 

INGREDIENTS: 
- 4 Large baking potatoes. Cut 'em in 1/2" cubes 
- 1 white onion, chopped
- 1 900ml container of chicken broth 
- 3 cloves garlic, minced
- 1/4 cup unsalted butter 
- 2 1/2 teaspoons salt 
- 1 tspn black pepper
- 1 teaspoon dried dill weed  
 ----- < ---- this is me separating the ingredients for you, so it's easier to follow. Because I care. 

- 1 cup half n' half cream 
- 1/2 package of bacon, cooked in 'da oven (if you need help on this one, leave a comment and I'll fill you in!) Cut up into wee pieces. Not bacon-bit small, but about 1/2" or so each. 
- 1 cup diced green onions 
- Shredded cheese, as desired 

OK. Turn your crockpot on low and put the first eight ingredients in there to simmer for 8 hours. In a hurry? Put it on high for 4 hours instead. 

After time has passed, do a gentle mash (I like mine a bit lumpy.) Add the cream, bacon, and green onions and stir. Put the crock on simmer (if you have that setting) or just on low until you are ready to eat. Add shredded cheese to each bowl when served. 

C'mon! This screams "I am a satisfying bowl of Canadian Fall/Winter dinner!" Right? Right. 

Get cooking, 
 Stace.

Sunday, October 27, 2013

Oat-rn't you glad I made these?

That title is ridiculous. But now you know what the main ingredient is in this one and you can either say "Ew! Oats! No thanks," and stop reading now. Or, you can say "Stace! Tell me more!" Which I shall now do. Read on, fellow oat lovers.

I wanted an alternative to cold cereal, eggs or toast for breakfast; something I could make quickly in the evening that would feed me for a few days. This is also a super snack for work, or just sitting at home with a cup of tea...and it has just 5 base ingredients. Bring on the peanut butter oat bars! 

You need: 
~ 4 cups of rolled oats 
~ 2 tablespoons of chia seeds 
~ 1/2 cup of slivered almonds 
~ 1/2 cup honey 
~ 1 cup peanut butter, melted

Then add in whatever you fancy: Dried fruits, chocolate chips, different seeds or nuts, ground flax...the options are endless! I used Craisins, and I wanted to add some chocolate too but was surprised to discover that my baking cupboard was bare. Doesn't everyone have chocolate chips, like, always on hand?! Apparently not. Dammit. So I halved and threw in a few chocolate-covered espresso beans, because I'm crazy like that. Not many, so they will only turn up in a few of the bars once cut. (those suckers are expensive!) *Note: I got the majority of my ingredients, including the sweet beans, at Bulk Barn. That store should give me discounts for the amount I plug the place. 

Combine the oats, seeds, and nuts in a large bowl. 

Pour in your honey and mix well, then add in the melted peanut butter and mix again. You might need to get into this with your hands to make sure it is all combined. 
Quick tip: BEFORE you get your hands in the sticky mess, fill your sink with a few inches of warm soapy water so you can dip in that after without coating your taps, counter, and anything else in the general vicinity with goo. 

Press the mix into a greased 9x13" pan. I lined mine with parchment paper and then used cooking spray on that. Overduing it? Mmmmaybe. But I'm a bit paranoid when it comes to my baking sticking, resulting in it falling apart or me throwing the dish out in anger because it's impossible to get clean. And then I'm sad. And sad is not how one should feel while playing in the kitchen. 

Pop it into a preheated 350 degree oven for 25 minutes. Say hello again to Lil' Red. 

 I zig-zag-drizzled a bit more honey over it after I took it from the oven. Let cool for a bit on the counter, then pop it in the fridge to harden before cutting. 

Give them a-go and let me know what you did to yours! 

 Get baking, 
 Stace. 
 Source:

Wednesday, October 2, 2013

Canape? Can-a-please.

Definition: The canape is an appetizer consisting usually of a thin slice of bread or toast spread with caviar or cheese or other savory food. 

Well, the tasty vessel used in this one was a chewy apricot, no bread or toasty bits of carbo-goodness. I was off to a housewarming party and I wanted to make something non-sticky, non-plate-requiring, yay-for-working-with-wine-and-other-liquors. Result? Turkish apricots topped with goat cheese goodness. 

Sweet Mother. These? Were awesome. There's a wee chance I ate 2 or 6 of these before we headed to the party.

Here's what I used: 

 ~ A sackful (no idea of the actual count) of turkish apricots. I found them at Bulk Barn. If you have this store, go. Go now. Go for the apricots and other fabulous ingredients. Such as.... 

~ Almonds! Dry roasted, no salt. *You're gonna season them yourself. Later. 
~ A lovely brick of goat cheese. 
~ Green onions.
~ Half n' half coffee cream. 
~ Seasonings. 

Step one: Put that gorgeous cheese in a bowl. Here's the brand I found at Save-On Foods: 

Two: Add a smidge of the cream; just enough to make the cheese a bit more...pliable? Spreadable? Yes. 
 
Three: Flavor your almonds. I put about a teaspoon of olive oil in a pan, heated 'er up, then added the almonds. Toss these constantly for about 4-5 minutes, until they are browned. Well, browner than the sad brown they were when you bought them. 

Drain them on a paper towel. Pat-pat-pat them down to get most of the oil off, then put in another bowl and toss with the seasonings of your choice while they're still warm. 

I used sea salt and some fresh cracked pepper. I figured I'd keep it simple and let the other ingredients speak for themselves. 

I then finely cut some green onion bits. We are now ready to layer! Apricot -- wee chunk of cheese -- onion slivers in a crissy-crossy pattern -- and the big finale, your roasted almond. 

This is my go-to plate of goodies for future potlucks/wine nights/housewarmings/birthdays...and maybe just when I feel like making wee treats for my own damn self. 

Get cooking/baking/treatin', 
Stace.

Source: http://reluctantentertainer.com/2011/06/day-13-keeping-fruits-nuts-and-cheeses-on-hand-for-apricot-and-goat-cheese-bites-recipe/

Saturday, September 21, 2013

Aw, so cute!

Baby Pizzas! 
Muffin tin madness!  

Yes, here's ANOTHER recipe using the muffin tin. I am hooked on all the ideas out there; what comes out of them is the perfect size for work lunches, a quick snack, or to have with a salad for dinner. *Use the mini-size for this recipe.* 

 So last week, during a wild thunder/lightning/sideways rain storm, Mum and I were on a cooking spree. We had quinoa and curiosity at hand, so these little treats were our next item on the agenda. 

Here's what you need:


1 cup uncooked quinoa 
2 large eggs 
1 cup chopped green onions 
1 cup shredded cheese 
2 teaspoons minced garlic 
 2 tablespoons dried basil 
1 full-size pepperoni stick, cut into approx 1/2" pieces 
1 teaspoon paprika 
1 teaspoon dried oregano 

Prepare your quinoa: 2 cups of water to the one cup of grains, in a covered pot, brought to a boil. Then simmer for 20 minutes or until quinoa is ready. Preheat your oven to 350. 

Mix all ingredients together in a large bowl. Once well combined, evenly distribute your gooey goodness into a greased *use lots to prevent sticking* tin. Fill each cup right to the top (it's pretty close to the amount of one heaping tablespoon in each.)
Press down gently to compact. 

Bake for 15-18 minutes. Cool for 10 minutes before removing from the pan. 

Two minutes after we pulled these from the oven we lost power in our neighborhood for almost 2 and a half hours. Thanks for the good timing, Mother Nature! Our "pizzas" were not ruined. 

Serve hot with a side of pizza sauce for dippin'. 

Now, would I make these again? Um....I'd give it a solid...Maybe? I enjoyed them, but I didn't love them. I kinda force myself to eat quinoa anyhow, so that could be the problem. If this was normal, gorgeous, gluten-filled pizza dough? That would be another story. (An I-gained-50-pounds story...) Ha! 

Get cooking, 
Stace. 

Source: http://www.fitsugar.com/Gluten-Free-Quinoa-Pizza-Bites-21988461

Saturday, September 14, 2013

Oh, sweet crunchiness.

When I need a snack, my brain automatically goes to the salty goodness of popcorn. But sometimes you need a quick shot of protein and maybe some sweetness, so I made a batch of these tonight:

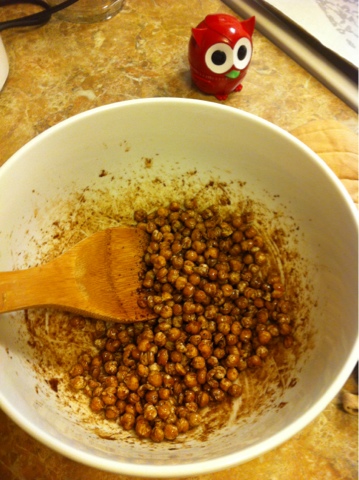
What is that, you ask? Answer: Oven roasted seasoned chickpeas. Yup. 

I know I say "this is so easy" on EVERY recipe, but it really is! I write this blog because I want to help non-cookers/bakers get in the kitchen. So here's a snack you can eat while in your car doing your bajillion errands. Or at your desk. Or even when you *gasp!* take some time for yourself in the evening in front of the telly. 

 All you need is:

~ 1 can of chickpeas (mine are currently drained, rinsed, and sitting on a paper towel to dry when I took this shot. Make sure you do the same!) 
~ 1/2 Tbspn olive oil 
~ 1 Tbspn honey 
~ 1/2 Tspn cinnamon 
~ 1/8 Tspn nutmeg 
~ 1/8 Tspn sea salt*

Set your oven to 375 and line a baking sheet with parchment paper or a silicone mat. Wish I had the latter, but since I have not yet picked one up, the parchment works pefectly well.

Spread out the 'peas on the pan and throw it in the oven for about 40 minutes.

Test one and if it's still a bit soft, give it about another 5 or 10 minutes. 

Next, pour them into your mixing bowl while still hot, and add your remaining ingredients. Give them a good stir-about, then pop them back in the oven for 10 more minutes to crisp up the coating.
I know you smiled when you saw Lil' Red. My cooking buddy. He keeps me on my toes. (Ie: That's my timer.)

*As mentioned earlier, my tooth is more savory than sweet, so I sprinkled a little extra salt on them. Let them cool then store in an air tight container. I'm a big fan of "why buy that when I've already got this?", so a jar that used to hold Mott's applesauce now works perfectly for my little edible friends.

High five to effortless, good-for-you recipes! 

Get cooking, 
Stace.
Source: http://www.fitsugar.com/Roasted-Honey-Cinnamon-Chickpeas-27908653

Wednesday, September 11, 2013

EggsEasyEggsEasy. Eggs.

Twelve hour work days are FUN. Yes! Woo! Alas, amongst the good times one must still find time to eat healthy and happily. 

Thus, the easy-peasy egg cups. 

I made these late last night after another long shift, and brought 2 into work this morning to zap and eat on my coffeebreak. Three colleagues saw them and said...."ohhh....that looks good!" So obviously, that was sign enough that I had to share it on here for them and the rest of y'all. Good thing I took pics. Heh.

Ok! Eggs! Veggies! Oven to 450! So simple! 

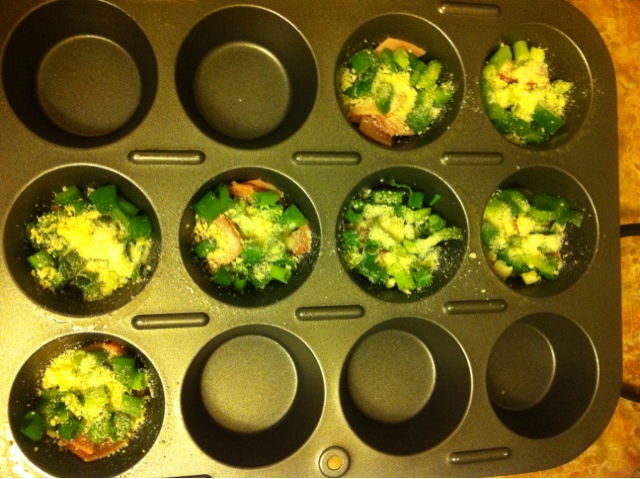
 Throw a sampling of bits in each cup of a muffin tin (spray well with Pam or what-have-you first).I diced up green onions, green pepper, black forest ham, a wee bit of irish cheese and some S&P.  

 Scramble your eggs in a separate bowl (aka add some milk, then whip-whip with a fork),

 and pour over each cup until 99% full. Bake for about 22 minutes, pull out of the oven, let cool in the pan, then remove and EAT. 

 Something this simple should be criminal. Get cookin/baking, Stace.

Tuesday, August 20, 2013

No coy title. Just cookies.

As usual, I came across this recipe on Pinterest and did NOT think this one was legit. No measuring of sugars and flour and baking soda? No cutting in or gentle blending? 

Nope. Check this out: 
Yeah. You are four (five if you count the eggs as individual units,) simple ingredients away from a fabulous, painfully easy, batch of peanut butter cookies. 

All you need to do is combine the cake mix, eggs, 1 cup of PB and 1/2 cup of canola oil. Roll into one inch balls - just use your hands, no fancy tools required - then evenly space on a baking sheet. 
Gently smoosh each with a fork one way, then the opposite to make pretty criss-crossy patterns. You know what's next: Put those babies into a (preheated) 350 degree oven. 10 to 12 minutes is all it takes... Keep your eye on them around 8 or 9 minutes. They can overbake in a hurry! 
* The lighting in this shot is weird but trust me; these are baked.* Set on racks to cool before packaging up. 

Oh, hello cookie. Why yes, I will take a plate of you to the family dinner for all. And I will save a few to have as tomorrow's breakfast, heh. Since I slaved ALL day making these, I deserve a few. Right? 

Get baking,
Stace. 

Source: www.youthlitreviews.com/2012 


Wednesday, August 14, 2013

Did you know?

Short and sweet (pun intended) entry: 

Apparently, if you wash your berries in this easy concoction, they can last days, even a week or two, longer than if left as-is. 
Mix one part apple cider vinegar to ten parts water. Put your fresh fruit in for a quick bath, rinse, and then store in the fridge. 

Have you tried this? If so, did it help? I've just done it for the first time tonight...so I'll let you know if it works! 

*The Web said no vinegar taste should be evident, either. I hope not...*


Sunday, August 11, 2013

You know ya wanna quinoa.

Quinoa. The holy grain of the giantly popular paleo lifestyle. *Note: never call it a diet to one who follows it. They WILL correct you to the word "lifestyle." Whatever. Let's all just eat and enjoy the stuff, shall we? 

Today I decided to get off the dinner (read: animal protein) cookery, and bake something that can be eaten as breakfast, a snack, or as a light lunch with something like a side salad. IF my recipe works, that is!

As always, I have to put my own spin on it and in this case I did for three reasons: The original calls for stevia, juice and zest from a fresh lemon, and egg whites. I did not have the first 2 and was feeling a bit anxious about wasting yolks (yeah I know, but if you've read previous posts you know this kills me). So let's see what my ingredient list looked like: 
You'll need: 
1 1/2 cups cooked quinoa 
1/2 tablespoon lemon juice
1 tablespoon pure honey
1 teaspoon sugar
1 teaspoon vanilla 
3 whole eggs
1 cup thawed bite size fruit blend
1/4 cup frozen pomegranate seeds
1 /2 teaspoon baking soda
Pinch of salt 

Preheat your oven to 350. Spray a standard-size muffin pan with cooking spray. Now in a medium bowl, combine all ingredients. Nom....look at that ooey gooey honey drip off the spoon...
Let your mix hang out in the bowl for awhile so it can thicken up a bit; I let mine sit about ten minutes while I hung laundry. Happy Susie Homemaker, that's me...*cough-not-quite-cough-cough.*

Ahem.

Here is what I found when I returned to the kitchen. Apparently I am now going to bake a batch of Smurfs.
 Alas, do not fret! I carried on with the plan and scooped even amounts into the pan, filling each cup halfway. Then off to the oven they go for 35 minutes.
This photo was after about 15 minutes of baking. I was expecting this to be a flop as they looked very wet and unhappy still. 

Nooooo! These have to come through! And guess what? 
They did! Oh quinoa. I'll never doubt you again. They weren't even blue anymore after they were done, but a toasty brown and perfectly moist in the middle.  Pleasantly surprised, for sure. 

Three tips: These do not rise like muffins or cupcakes; they're rather small and disc-like so be prepared for that. Also, they are tricky buggers to get out of the pan, so go heavy on the pre-greasing before baking. Lastly I think 3 whole eggs may have been a bit much, so next time I'll try with just 2. 

Now to eat with a wee dollop of Greek yogurt! 
Get cooking, or uh, baking,
Stace. 
Source: www.damyhealth.com

Wednesday, July 31, 2013

Green is Good.

What I'm talking about here? Is the avocado. Full of the "good fat", avocados are a tasty addition to any diet.

Especially when they've got gorgeous toppings and are served right out of the oven. 

Whoa. That’s really the only word that sufficiently describes my first bite of this recipe. Savoury, creamy, with just enough tangy sweetness as well. Talk about a satisfying mouthful! And these were ready in less than ten minutes! (This is minus the time your oven takes to preheat, of course.) 

Here’s the recipe for salsa-topped avocados. I will say "you're welcome" right now because you will make these again and again. Betcha $5. (I would say more than $5, but I need that money for more groceries, to try more recipes, so you can keep eating well too. It's all about you, really.) 

Preheat your oven to 450.

Ingredients: 
1 avocado, sliced in half lengthwise and stone removed 
¼ cup panko bread crumbs 
¼ salsa. *I used the ‘mild’ spice level (because I’m a bit of a wuss). 
1 tablespoon basil
3 teaspoons lemon juice 
1 tablespoon crumbled feta
1 large strawberry, cut into 6 little wedges 
Salt and pepper (to taste)

Combine all ingredients except the avocado and strawberry, in a small bowl. Split contents evenly and spread on each avocado half, then top each half with three apiece of the strawberry. Place on baking sheet, throw in the oven for 5 minutes, and they're ready! 

I ate mine with rice crackers; take a fork to the goods and spread on each. I can't stop making these. Healthy fast supper. 

Get cooking,
Stace
NOTE: Sorry my cooking photos aren't on here! I don't know why my computer hates me lately. It would NOT upload photos to this site, no matter how many times I tried. Check out the pics on my recipe source; it honestly looked just like theirs: www.melecotte.com/recipes

Sunday, July 28, 2013

Beef: Bring it.

Burgers.
Meatballs.
Spaghetti sauce.
But most of all? Steak. Ooooooh, how I love thee. And it's not something I treat myself to that often at home because really, I haven't a bloody clue how to grill. Plus I don't own a BBQ, which is rather essential and I've never tried using my George Foreman for anything other than ground beef. Although there is a BBQ here where I am housesitting all summer...yet I fear turning it on, lest I singe off my face and I have no one around to call 911 as I live alone. *Uh...that took a rather overdramatic turn...*

So this was the compromise! I broiled some lovely thin flank steaks, stuffed with goodness. Check it:

HUZZAH!

Steak rollies.

Now it's your turn! Preheat your oven to 425 degrees.
Saute' 3/4 of a large box of organic fresh spinach, until wilted down.

In a medium bowl, combine:
1 wee jar of sundried tomatoes, drained
2 tablespoons panko bread crumbs
1 egg yolk
Garlic salt and pepper
Your saute'ed spinach

~ Season your meat with additional sprinkling of the S&P. Then spread an even amount of the filling on each of your steaks; leave a bit of room around the edges. I also mixed in some feta (shocker, I know) as the original recipe called for blue cheese but I'm not a fan of that stuff. Do as you see fit; that's the fun in cooking, modifying it to whatever you want to do! No rules!
OK, OK. There's some rules. Like, don't serve this raw. Time to roll them up and put them in the oven. I secured each of mine with dental floss as I didn't have cooking twine and it worked like a hot damn.


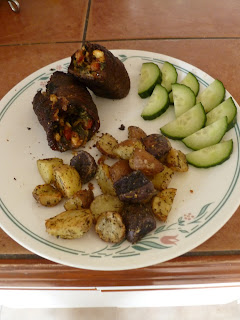
(Yeah they look a bit creepy here, I agree. But after about 35 minutes of roasting, plus a quick 5-minute broil (sadly mine had a 10-minute broil and as you see below from the color, it was too much.) I did say I would admit my wins and losses on here, sigh.

Alas, it was still damn tasty! Enjoy your fancy pants creation with some fresh veg and a lovely starch.
Thanks for tuning in to another entry. Now get cooking,
Stace.
 
Source: http://www.familycircle.com/recipes/comfortfood/stuffed-flank-steak/?page=4